
Slate Roof Flashing Essentials
Understand roof geometry and slate installation impact
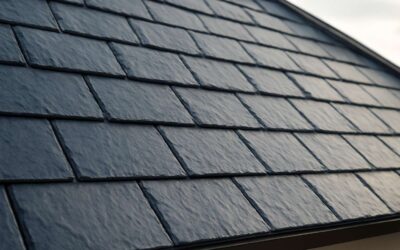
Storms drift across South Africa’s towns like old tales, and slate roof flashing details stand as quiet guardians against leaks. In climates ranging from coastal gusts to Highveld sun, well-executed details can cut leaks by up to 40% during the wet season. These details hinge on roof geometry and the careful marriage of slate to the underlayment.
Understand roof geometry and slate installation impact when you study how water rides along hips, ridges, and abutments. The way slate courses overlap, where nails land, and how sealing compounds breathe with heat all shape performance. It’s not magic; it’s geometry, weight, and patience doing their work in harmony.
Here are key elements that align with the narrative of slate roof flashing details in South Africa:
- Ridge and hip lines guide water away from joints while defining flashing transitions
- Valley intersections require clean laps and allowances for slate expansion
- Nail schedules and slate thickness influence how flashing seals around penetrations
Key flashing components for slate roofs
In our experience, up to 40% of leaks trace back to flashing gaps: slate roof flashing details aren’t magic; they’re choreography—weight, heat, and joint movement learning to tango. On South Africa’s coast and in the Highveld, well-sighted flashing keeps rain from turning a lounge into a fishbowl while letting the slate gleam without drama.
Core components keep the ballet balanced:
- Step flashing where slate meets walls, dormers, or hips
- Ridge and hip flashings that define transitions and shed water gracefully
- Valley flashings with clean laps and allowances for slate expansion
- Nail schedules and breathable sealants that accommodate heat and movement
These elements, chosen with care, work behind the scenes to support the weight and rhythm of a slate roof without fanfare.
Common failure modes for flashing on slate
A single drizzle on a South Africa coast roof can turn a quiet living room into a fishbowl by dawn. In field experience, up to 40% of leaks trace back to flashing gaps.
Common failure modes for flashing on slate reveal themselves in quiet, stubborn ways:
- Inadequate laps and expansion allowances that let slate shift and water creep in.
- Nail corrosion or loose fasteners that create tiny gaps as heat moves the slate.
- Incompatible sealants or metals that crack, crumble, or bind under temperature swings.
- Valleys and ridges with misaligned flashings that trap moisture and wick water toward the interior.
These failures highlight slate roof flashing details as a living system—designed to breathe with sun and rain while keeping the interior dry and the slate gleaming.
Building codes and standards for slate flashing
Across South Africa’s wind-swept and sun-dappled roofs, slate roof flashing details are codified to endure. The SANS 10400 series, together with municipal standards, demands long-term water tightness and safe workmanship. These codes shape a design language that breathes with sun and rain while keeping interiors dry and slate gleaming.
- Weathertightness, drainage, and coordination
- Material compatibility and corrosion resistance
- Flashing laps, joints, and movement allowances
- Inspection and maintenance expectations
Within these standards, professionals balance aesthetics and durability in a continuous dialogue with rain and sun.
Safety practices when working on slate roofs
Safety is the quiet partner of a long-lasting roof, a line a seasoned roofer once whispered as we surveyed a Cape Town skylight. Slate roof flashing details demand respect for every seam and surface you meet. When the craft treats slate as a living part of the home, rather than a cold canvas, the flashing endures and interiors stay dry, gleaming beneath the sun.
- Fall protection is treated as a non-negotiable anchor.
- Weather awareness guides scheduling, because wind or rain transform slick slate.
- PPE and training safeguard hands, eyes, and balance on steep pitches.
- Clear communication and on-site coordination prevent missteps and keep everyone in sync.
With this mindset, safety and craftsmanship dance in harmony, letting the sun and rain test the slate while interiors stay calm and dry.
Flashing configurations for slate roofs
Step flashing vs counter flashing for slate intersections
Across South Africa’s storm-swept rooftops, a single detail can stop a leak before dawn. Coastal leaks often begin where flashing meets slate, and slate roof flashing details reveal a quiet, weather-wise craft.
Step flashing vs counter flashing for slate intersections isn’t a rigid script; it’s a dialogue between metal and slate. Step flashing threads through each slate course, creating a stair-step path that sheds water. Counter flashing seals the top, guiding runoff away from joints.
Within these configurations, consider the practical alignment of elements:
- Step flashing: continuity with slate.
- Counter flashing: top-edge protection.
- Hybrid: combine for extremes.
These choices echo the region’s climate and craftsmanship, keeping the roof details attentive to season and sun.
Valley flashing configurations on slate roofs
Storm season across South Africa tests every valley on a slate roof. In fact, up to 60% of leaks begin where flashing meets slate, a moment that sets dry mornings apart from damp ones. Valley flashing configurations on slate roofs blend craft with climate, turning a potential seam into a guardian. Slate roof flashing details weave metal and slate into a single thread.
Consider these natural configurations that respect slate and wind:
- Continuous valley flashing that runs the length of the valley with an apron at the slate edges
- Interlocked valley with stepping and a cap to cover joints
- Hybrid approach that combines both strategies in high-wind or heavy-rain zones
Across South Africa’s roofs, these configurations honor climate and craftsmanship, keeping lines tidy and leaks at bay without fuss. The result is a silhouette that remains faithful to slate’s character while guiding water away from joints.
Flashing at chimneys and vents for slate roofs
Storm season in South Africa tests every slate roof to its edge; up to 60% of leaks trace to the moment flashing meets slate. At chimney flues and vent outlets, a tiny seam becomes a storm’s stepping stone—quiet, stubborn, and consequential. The craft of slate roof flashing details stitches metal to mineral with patient precision, preserving the slate’s natural cadence.
Flashing at chimneys and vents should respond to wind and water alike: a continuous apron that sits along the slate edge, a stepped counter-flashing that climbs the course-by-course, and a cap that seals the joints without pinching the stone. This is where geometry and weather meet, a choreography that keeps moisture from freckling the daylight hours.
- Continuous apron alignment with slate edges to impede capillary draw
- Counter-flashing stepped to slate courses with a protective cap
Across South Africa’s varied climates, these configurations maintain a tidy silhouette while guiding water away from delicate joints.
Roof-to-wall transitions on slate buildings
South Africa’s storms test every slate roof to its edge, and roof-to-wall transitions take the hardest hits. The joint where mineral meets wall isn’t showy—it must work, and slate roof flashing details that respond to wind and rain keep the seam honest and the slate listening to the weather.
Flashing configurations at roof-to-wall transitions vary with wall material and slope. The trim should sit cleanly along the course line, with metal that ages gracefully and a seal that doesn’t pinch slate.
Where South Africa’s climates are varied, a well-flashed transition remains discreet while guiding water away. Flashing details keep performance consistent across seasons.
Installation best practices for slate roof flashing
Material compatibility and fasteners for slate flashing
Across South Africa’s varied climates, a single overlooked seam can invite damp through a slate roof. The truth behind slate roof flashing details isn’t glamorous, but fundamental: gaps and misalignment quietly erode a roof’s dignity. When flashing aligns with slate, the building breathes easier.
Installation best practices reveal that material compatibility and fastener selection shape long-term performance more than flashings in isolation. In salty coastal air or inland heat, copper and stainless steel components harmonize with slate, while reactive metals invite corrosion. Flexible, slate-compatible sealants maintain movement without cracking.
- Material compatibility: copper or stainless steel fasteners and flashing components.
- Fastener strategy: position fasteners along the slate’s edge and countersunk so they don’t hinder water shedding.
- Sealants: slate-friendly sealants that stay flexible in South Africa’s heat and rain.
Ultimately, slate roof flashing details become a quiet membrane—visible only if missing, yet essential to a roof aging gracefully under the Southern sun.
Layment patterns and shingle overlap to preserve seal
Ninety percent of leaks on slate roofs start at a single misaligned seam, and South Africa’s varied climates only amplify the risk.
Getting the slate roof flashing details right starts with consistent layment patterns and proper shingle overlap to preserve the seal. A tight, continuous line helps water shed cleanly with wind and rain.
- Stagger joints so head joints don’t line up across courses.
- Maintain edge-to-edge overlap to guide water over the slate face.
- Allow movement with flexible sealants at transitions and terminations.
In SA’s sun and coastal air, a disciplined approach keeps a slate roof aging gracefully.
Flashing timelines and weather considerations
On a Cape dawn or a Durban dusk, the timing of installation matters as much as the technique. In SA, weather is a fickle collaborator—sun-baked days yield to sudden showers, and slate roofs demand a patient rhythm. When the topic turns to slate roof flashing details, the aim is to finish within dry spells so each joint can breathe and settle, creating a continuous seam that guides rain with the wind. The result is a seam faithful to the roof’s line, resisting the pull of wind and spray.
- Dry-season windows typical in SA weather patterns—allowing inspection and settlement
- Salt spray and material compatibility for coastal sites
- Temperature swings and movement in slate and flashing metals
These considerations shape installation timelines and weather expectations, balancing precision with the realities of sun and sea air. Resilience stays true to the roof’s line and the coast that bears its weight.
Integration with gutter and drip edge systems
Coastal SA roofs face sun, wind, and spray; industry notes that up to 52% of coastal leaks trace to flashing gaps, a wake-up call for the discerning roofer. Mastery of slate roof flashing details is the art of letting rain breathe along a line that stays faithful to the roof’s rhythm.
When integrating with gutter and drip edge systems, alignment matters as much as material choice—an elegant seam that channels rain with the wind and never fights it.
- Coordinate with gutter fabrication before setting flashing to ensure a continuous silhouette
- Choose coastal-grade metals and sealants compatible with slate to resist salt spray
- Test water flow at a dry run to confirm a tight, drainage-friendly seam
Done well, slate roof flashing details become a quiet chorus along the eave—resilient, faithful to the roof line, and ready for the next SA weather spell.
Maintenance and inspection of slate flashing
Detecting corrosion, gaps, and slipped slate
In South Africa, a slate roof bears more than weather; it carries a quiet philosophy of resilience. Maintenance and inspection are not chores but an ongoing conversation with your building’s anatomy, and slate roof flashing details sit at the heart of that dialogue.
Detecting corrosion, gaps, and slipped slate requires a careful gaze and a calm hand. Look for dull metal staining, loose fasteners, and any movement in the slate that suggests misalignment or fracture. These are the telltale whispers before a leak becomes a crisis.
- Rust or corrosion along metal flashings
- Gaps or displacement at fastener points
- Displaced or cracked slate near flashing transitions
Regular, unobtrusive checks during mild seasons keep the system honest and the interior dry, aligning with a broader ethos of care for historic or modern slate roofs alike.
Sealant selection and replacement intervals
Storms in South Africa are not just weather—they test every slate roof’s memory. The way slate and flashing hold together is a story of resilience and quiet engineering. Slate roof flashing details sit at the heart of that story.
Maintenance and inspection are ongoing conversations with your roof. In mild seasons, a calm glance can reveal wear—hairline leaks, discoloured metal, or gapped joints. Coastal salt spray and highveld sun shape what to watch. Here’s what to keep in view:
- Sealant integrity around transitions and flashing joints
- Rust or staining on metal flashings
- Displacement or movement at fastener points
Sealant selection and replacement intervals are part of the long game. Choose materials compatible with slate and metal, with good UV resistance and flexible performance. In South Africa’s climate, replacement windows commonly fall between five and eight years, though local exposure and quality of installation matter. Regular reviews help protect interiors from damp and preserve both heritage and modern aesthetics in slate buildings. Care with slate roof flashing details reduces long-term risk.
Cleaning practices to avoid slate damage
Storms in South Africa never just pass by; they audit every slate roof flashing details with a keen eye. Maintenance and inspection are ongoing conversations with your roof—the kind you have during calm seasons and test after a downpour. A well-tuned roof tells a story of resilience, not drama.
In mild seasons, a quiet walk around the eaves can flag telltale wear: moisture staining, slight movement, or metal that’s lost its shine. Coastal salt spray and the Highveld sun sketch what to watch, so schedule a light check that doesn’t require a ladder to Mars.
To keep slate safe and avoid damage from cleaning, follow these simple practices:
- Use a soft brush or low-pressure rinse, not power washing.
- Choose a pH-neutral cleaner and plain water; avoid acids or solvents.
- Remove moss and debris with a plastic or wooden tool, never metal.
Regular inspections after storms help catch early issues before damp interiors and rising maintenance bills become the headline act.
Seasonal inspection checklist
“A roof is a diary written in rain,” a mentor used to say, and storms in our coastal air still autograph slate with quiet certainty. Maintenance and inspection become conversations with the roof itself, especially around slate roof flashing details that keep summer heat and swift squalls at bay.
In mild seasons, a careful walk around the eaves reveals stories of wear: subtle staining, tiny shifts, or metal that has lost its gloss. The Highveld sun and coastal spray leave signatures, so plan a light check that respects the rhythm of the slate.
- Observe joints, seams, and flashes where they meet edges or vents
- Note any corrosion, loose fasteners, or displaced slate near flashing
- Watch for staining or damp tracks that hint at hidden leaks
Regular inspections after storms catch issues before damp interiors and rising bills headline the next season.
Troubleshooting common issues and cost considerations
Diagnosing leaks around flashings on slate roofs
Slate roofs don’t forgive shoddy flashing. After a storm, a tiny damp spot often traces back to slate roof flashing details that were overlooked. In South Africa’s coastal climate, salt and rain team up to attack joints, turning a whisper of a drip into a full-on drama.
Troubleshooting common issues reveals predictable culprits: misaligned or lifted slates, corroded metal flashings, and aging sealants that leave stubborn gaps at valleys and intersections. Leaks tend to mirror wind-driven water paths rather than random drips, so signs like staining, moss, or granule loss are your breadcrumbs.
Cost considerations often swing on a few big tickets:
- Material cost swings
- Labor and access
- Scaffolding and permits
- Maintenance vs replacement
Ultimately, the price tag hinges on condition and accessibility; professional assessment remains the smart bet in SA. Even when slate roof flashing details are aging, choosing measured repairs over knee-jerk replacements saves money and heartache.
When to replace flashing vs repair
Storms reveal the truth about slate roof flashing details: a tiny drip today becomes a chorus tomorrow. In South Africa’s coastal climate, salt and rain conspire to test joints, turning a whisper into a drama. Watch wind-driven damp trails rather than a single drip; they are your breadcrumbs.
Cost considerations hinge on a few big tickets. Material costs and durability, labor and access, and scaffolding and permits shape the final bill.
- Material costs and durability
- Labor and access challenges
- Scaffolding, permits and site protection
When to replace flashing vs repair: if flashing shows widespread corrosion or cracked connections, replacement often saves long-term headache; otherwise, measured repairs preserve slate and seal. A professional assessment remains the smart bet in SA.
Cost ranges for slate flashing projects
Storm-driven coastal seasons reveal gaps in slate roof flashing details; damp trails streak the walls rather than a single drip, especially with salt spray. Troubleshooting centers on moisture pathways along joints, layment edges, and chimney interfaces, plus the condition of the slates themselves.
Cost ranges for slate flashing projects in SA hinge on access, materials, and site protection. Minor resealing might sit around R3,000–R12,000; full replacement with scaffold and permits can fall between R15,000 and R60,000, depending on length and complexity.
- Materials, durability, and compatibility with slate
- Labor availability and access constraints
- Scaffold needs, permits, and site protection measures
A professional assessment remains the smart bet in SA, guiding whether repairs suffice or a full replacement is warranted.
Choosing a contractor: questions to ask about flashing on slate roofs
Rough coastal seasons reveal moisture’s map: leaks follow joints, layment edges, and chimney interfaces. Watch for damp streaks where salt spray lingers—the clues guide troubleshooting.
Cost hinges on access, materials, and site protection. Minor reseals sit around R3,000–R12,000; full replacements with scaffold and permits can range from R15,000 to R60,000, depending on length and complexity.
When selecting a contractor, a measured talk matters. Ask about SA slate experience, warranties, and how moisture pathways will be evaluated during the visit.
Consider these questions to guide the conversation:
- How do you protect slate and nearby finishes during work?
- Will you provide a written assessment of moisture pathways?
- Which flashing materials do you recommend for slate?
- Can you supply SA project references?
Consider the broader context of slate roof flashing details as you weigh options, and request a staged plan that balances inspection, repair, and roofscape protection.

0 Comments